Tuesday, December 9, 2014

CHRISTMAS GIFTS

QUICK AND EASY CHRISTMAS GIFTS

With little and no time to sew, I did manage to whip out a couple Christmas gifts.


My experience with making men's shirts has been an ongoing process.  Not exactly successful as each new shirt came together, but maybe, just maybe, this one is correct at long last.
 
     My first attempt I put the buttonholes on the right side of the front, which made my husband absolutely refuse to wear it.
     My second attempt I got the buttonholes on the correct side, but had the buttonholes going horizontally, instead of vertical.  My husband wears it, but complains.
     My third attempt I got the front panel and buttonholes all correct, but got the buttonhole on the wrong side of one cuff so that it buttoned backwards.  I offered to take that apart and fix it, but my husband said he could deal with it; however, the way he deals with it is to have me button it, because he can't figure out how.
     Do you get the picture that I somehow have a problem with buttonholes?
 
     The third shirt is above.  It's not for my husband (I hope that is not the winning trick).  It is for a skiing friend of mine and was inspired, or I was motivated to make it only because I saw the fabric print of skiers everywhere.   Since he has spent a great deal of time attempting to make me a better skier (he is an instructor), I made it for him as a gift.  The buttonholes are on the right side, the right direction, and so are the cuffs.  Success at last!
 
     We won't tell my husband, but I also found a fabric with cars all over it at the same time I found the skiers.  Since my husband's business is used auto parts, cars, etc., I purchased that fabric for him, and have made a shirt for him for Christmas.  I think it is all correct, but won't know for sure until he inspects it Christmas morning.
 
     Now, I couldn't give my skiing friend a shirt without giving his wife something.  She had admired a sweatshirt jacket I had made for myself a long time ago, so I made a sweatshirt jacket for her.
 
     I cut off the cuffs and lower band and replaced them with a polyester silk print (not a fabric I like to work with, but when you live where I live, you use what you can find if you are doing something on the spur of the moment.) .  Then I sewed panels of the print in stips up both side fronts and both side backs, as well as along the sleeves. 
     Next I made horizontal sewn lines across the stips 6 inches apart, and cut the fleece along each side inside the now sewn rectangles.  DO NOT cut across the top of each rectangle.
     I gathered the loose piece of fleece in the center and wrapped thread around it to hold it gathered up, and sewed a medium size pearl in the center.
     I made a waistband of the silk print, as well as bound the sleeves with the print.
    I finished the gift by making an infinity scarf out of the leftover silk print.


Monday, December 8, 2014

Plaid Dilemna

Self-designed Skirt Pattern

      I bought this plaid fabric last spring, at Mood's, while on a whirlwind trip into the city for a day of fabric shopping only.  I have to say this is a real treat for me, as I live in Ohio, and getting quality fabric where I live is next to impossible.  So, while working in Connecticut, a train ride is just an hour away and I am in NYC.  Awesome!!

       I decided I wanted a long skirt for the holidays, and I wanted it to be on the bias.  This, of course, was a decision I made at a moment's thought, and needed to get it made in a day.  Normally not a problem to make a skirt.  

  However, once I made the pattern, and laid it out on the fabric, I realized that the fabric was not quite wide enough for the circular skirt on a bias.

But that's no problem.  Just piece the small corner where it needed more fabric.  Match the plaid while piecing and you are good to go.  Right?    It took about an hour to get the pieces just right, but I was quite pleased with the final result, once the two, front and back, pieces were cut out.


     But then another "however."  As I went to sew up the sides, voila!  I had completely forgotten to turn the underside piece of fabric around and had simply folded it over and cut both pattern pieces together.  (For someone who makes French jackets, and does a lot of couture sewing, I know very well that you need to cut all pattern pieces out on a single layer.  What was I thinking?

     So the fix, because I really, really wanted to wear this skirt to an informal dinner, with a heavy, turtleneck sweater, was to sew a piece of grosgrain ribbon down the side to separate the two pieces.


Am I happy with the result?  Heavens NO.  I need another trip to Mood to get enough fabric to make another back piece that matches.

And for the last "however,"  I love the skirt from the front and the back, and if my arms were long enough to totally hide the side seams, I would be good to go.

My husband says that no one would ever notice the sides, but I do, and I am quite sure any other true sewer/seamtress would, also.


Saturday, November 8, 2014

Three Hour Dress

Free Pattern Wrap Dress

              I have on several occasions mentioned my friend Rhonda Buss and her wonderful blog, Rhonda's Creative Live,  She recently started a Free Pattern Friday blog, and it is amazing the free patterns she finds and posts the link in order for anyone to download them, print them out, tape the patterns pieces together and make.

             At first, I wasn't sure I wanted to go to the trouble to figure out how to tape the pieces of the pattern together to make full pattern pieces, but it turned out to be quite easy and here is the final project.

                                                           Free Pattern (better view)


A first attempt at a selfie!


I had been looking for a pattern that would show off this unusual print, which I loved, and I think this wrap dress does the trick.  The fabric is a light weight jersey knit that I purchased from Mood Fabrics online.
 
And the dress truly only took three hours to make.  Such fun.
 

Thursday, October 30, 2014

Fall Couture Jacket

French Jacket with Orange Trim

  Having recently returned from a couture jacket class with Susan Khalje the first part of October, I think the finished jacket is well worth the class.


  This view shows the pockets with the fuzzy orange trim and button.  I didn't have quite enough trim, so I split it in half and put the button in the middle, so it actually looks like the trim goes clear across the pocket.

  I'm not very good at selfies, but this at least shows the entire jacket.  I purchased the fashion fabric, the trim, the lining and the buttons in Paris last November.  The fashion fabric is authentic Chanel, and of course, the lining is pure silk.  So wonderful with which to work.

I am so looking forward to making another jacket like this soon, even though it is a tremendous amount of work.  The fashion fabric is quilted to the lining before the pieces are sewn together.  Only the shoulder seems and side seams are sewn on the machine.  The rest is by hand.

The sleeve is a three-piece pattern, and it is sewn together by machine, but sewn into the jacket by hand.


Thursday, October 9, 2014

Couture Dress

Couture Dress, Paris Fabric

It has taken a while, but at long last I am posting the picture of the couture dress that I made in a class in Maryland with Susan Khalje.  I love her classes and I learn so very much.

This dress is my own design, so I can't give a pattern reference.  One of my classmates dubbed it "The Parabolic Dress."  It has a piece on the front that is a parabolic shape and drapes/hangs a bit like a waterfall.

The skirt is made of a Dolce Gabbana chiffon that I purchased in Paris last November.  The bodice is a guipure lace that I purchased at B&J's in New York.  It is lined in charmeuse that I got at Mood in New York.

I love the dress and hope that I find someplace to wear in sometime soon.


Monday, April 28, 2014

BLOUSES, BLOUSES and MORE BLOUSES

A COLLECION OF BLOUSES I HAVE MADE


Black jersey knit with a silver sparkle, like fireworks, here and there.  The neckline is pleated.

I have shown this blouse before.  It is made of charmeuse with a draped neckline.  I made this blouse entirely by hand, with not one machine stitch in it.

Navy and white chiffon, made from the same pattern as above but with long sleeves

A closeup of the sleeve

 
This is my favorite evening or dress-up blouse.  It is made of a sheer lace that I utilized the scalloped edges as the hem and down the front, where I placed loop buttonholes and pearl buttons.

This is a jacquard silk with a tie neck.  Great with suits

And my ruffled jabot on satin.

A print chiffon.  The neckline was supposed to be entirely different, according to the pattern.  It was suppose to have a very large scarf attached to the collar, but when I got the collar on the blouse, I liked it without the scarf, so I gathered the collar up the front, and voila,  here it is.

Not a very clear picture of this sweater It has organdy flowers along the V-neck.

MEMORIES

FIRST EVENING GOWN

     While watching the Academy Awards, I saw a gown on the Red Carpet that sparked a distant memory.  That of the very first evening own I ever made, at the age of 16.  I was an officer in Rainbow Girls, and as such we were required to wear evening gowns for installation of officers and initiation of new members.  The dress I made was very similar to a dress displayed on the Red Carpet.
     As I was wishing I had kept the dress, I remembered that my mother had had my portrait made in the dress to give to my father for Fathers' Day, and I still have the portrait.
     So, here is the very first evening gown I ever made:
The points actually had boning in them.  I had no idea how to insert boning, but just followed the directions on the pattern instructions.


Sunday, April 6, 2014

SPRING ON THE HORZON

Spring Bomber Jacket

     So tired of cold, icy, wet winter?  So am I.  Time to get out the ligher-weight fabrics and put together some new things for spring and summer.
     I started with a quilted bomber jacket.
A very simple jacket made with a prequilted fabric.

And another bomber jacket.
I did a tremendous amount of applique with this jacket.

The base is ultrasuade and the applique is all silk challis.

Next I added a summer dress.
Originally it can be worn hanging loose.

But I quickly decided that I like it better with a belt.

Added a couple loose-fitting tops.

  And I think I am good to go.

However, at Neiman Marcus I found a sweater vest that  I loved.
And set about knitting my own version.

And that's all, Folks, for this blog.

Friday, February 14, 2014

Brown Polka Dot Blouse

Anne Klein Blouse

     I made a blouse to go with the unmatched plaid.  Once again, it was a major challenge.  For many years I refused to make blouses, as I just didn't like making them.  Then I took a couture class with Susan Khalje and learned some great fitting techniques and decided blouses just couldn't be that hard if I could make a French jacket, so off I went to start making blouses.
 
     The first several I made were easy and I loved and wore them often.  Then I moved on to more complicated patterns, which I like a challenge.  It seems that as I have moved forward the blouse patterns have gotten more and more challenging, and this one was no exception.


The pattern is a Vogue, Anne Klein.  The back of the sleeve and the back yolk are all one piece with pleats that run into the seam and are on the back of the sleeve itself.  Took some figuring out to put that together correctly, but I succeeded after tearing it out a few times.
 
Can anyone explain to me why when you make a buttonhole sample in the exact same fabric and exact same number of layers, interfacing, etc., the sample turns out perfect and when you do it on the garment it self -----------
 
------you get this?!!!!!
I even used Sulky Tear-away as an envelop around the front and back in hopes that would keep it even.
 
The finished blouse is nice


Sunday, February 9, 2014

Unmatched Plaid Suit

THE DIFFICULT PLAID

       Several years ago I purchased about four yards of a plaid wool that I absolutely loved, and like so many other wonderful fabrics, I never got around to working with it, so that became my "after Christmas" project.
       My first plan was to make a pantsuit, but once I looked at the actual plaid, I quickly changed that ambitious plan to just a jacket, which is wherein the problems began. 
       Here is the pattern that I chose:
 
And here is the fabric.  I hope you can see the many different parts to the plaid. 
 
If you look closely, you will see that horizontally there is a group of three stripes (in the middle of the picture), a group of four stripes of different sizes (bottom of the photo), and at the very top of the photo is a group of four stripes that are two sets of two stripes, equal size.
 
Then comes the fun part:  Vertically, on the left is a group of four stripes, pretty much equal size; in the middle is six stripes that two sets of three each, equal size, and then on the right it looks like they are the same as the ones on the left, but trust me, they are not.
 
After spending several hours trying to get the plaid to match from all angles,  the front panels (success), the side front and side back and back and shoulders (unsuccessful), I decided to put the project on the shelf for a time and maybe when I'd get back to it I would have a better perspective and be able to get it to match.  Wrong.
 
So, to remedy the problem, I took the easy way out and decided to make the side back and side front panels out of a soft leather; and I promptly ordered a Donna Karan leather from Mood.  Loving Donna Karan style, I figured if it was a DK leather it would be a soft supple leather with which to work.  Wrong.
I, actually, at first, thought maybe she made boots out of the leather I got!!  So I was back to the drawing board.
 
Living in an area where I have one choice only for fabric, Jo Ann's, I was not too hopeful on finding a companion fabric for this jacket, but I had a few days to work on it and truly wanted to get it finished.  So nothing ventured, nothing gained.  Off to Jo Ann's I went, and VOILA I found the perfect companion. 
 
Here is the plaid matched with the stiff leather and then matched with the grey wool from Jo Ann's.
After checking this out for the color combination I decided the lighter grey looked better.
 
I then decided to pipe the seams with a dark leather piping.  So I cut two-inch wide bias strips from the leather, which, surprisingly, softened up as I worked with it.
 
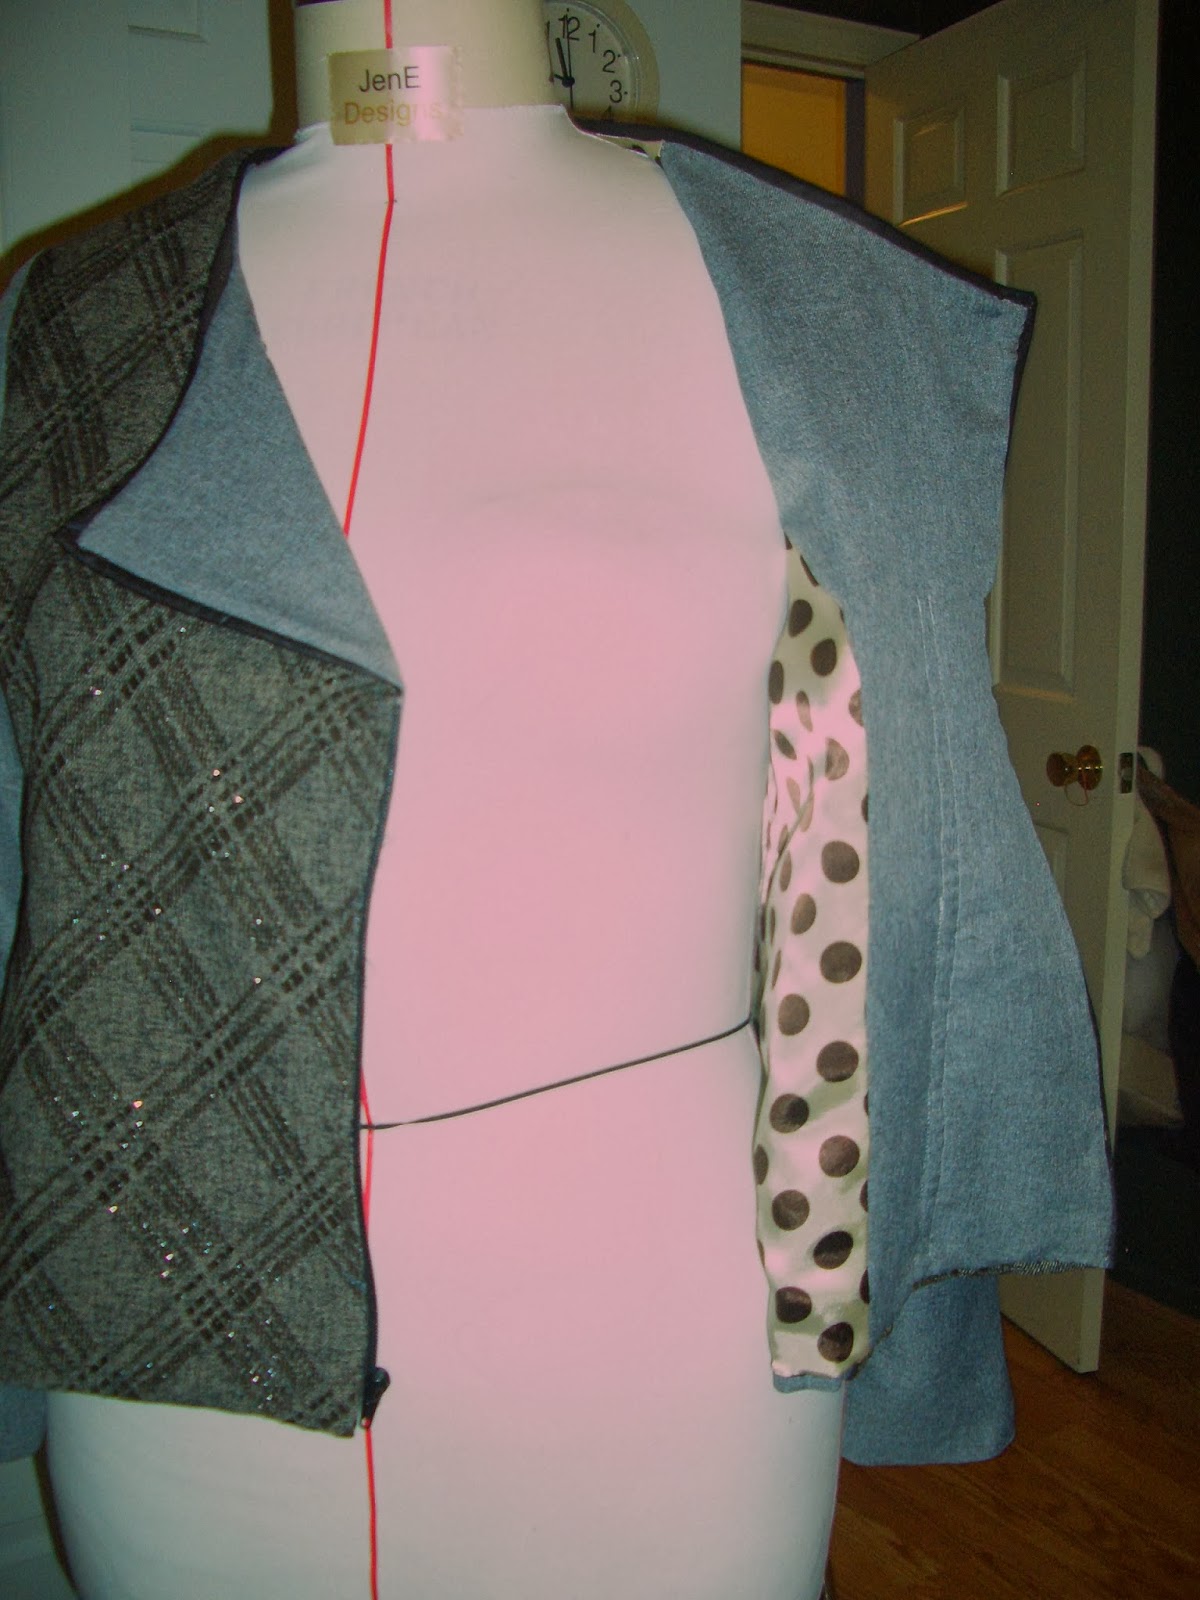
I underlined the plaid with one layer of black silk organza and the side front and side back with a double layer of the silk organza, because the grey wool was a lighter weight than the plaid.  I also put a double layer of silk organza across the upper back.
 
And here is the front and the back of the jacket before I added the sleeves and lining.
In this photo I have not added the off center, outside zipper yet.

 
As those of you who know me, you will recognize the use of a wild different lining choice.
 
And here is the final product, which in my humble opinion turned out great.  I love it.  And I am now making a skirt to go with it, and when it is finished (soon, I promise), I will enlist my nonphotographer husband to take a picture of me wearing it and will post it.
I really like the zipper placement.
 
The right sleeve in this photo is distorted, as it has the dress form arm inside it, which is not the best fit.
 
The biggest challenge, after the plaid matching, of course, was turning the corners with the leather piping.  I am certain there is a better way to do it that would create a much better point.  But this will have to do.
 
And the suit is completed with a Sandra Betzina skirt.